Just A Small Guideline

Feel free to browse the site. Don't be afraid to leave comments, they're supportive.
Please follow me on Twitter @ehldmnt and retweet my posts.
Showing posts with label learning. Show all posts

Tuesday, September 3, 2013

Appreciating the Little Victories, Getting Over Mistakes and Taking Baby Steps Out of Bad Habits

I like improving.

No.

I love improving, no matter what it is. I was never an optimist, but I generally never try to put myself down. When I have a dream or desire, I seek it, but I feel that at times my dreams are so extravagant, that I am unable to obtain my smaller goals. Programming has always been a joy to me, whether it is the actual sitting down and typing out the code, or crunching concepts in my head as to what could possibly be highly effective.

My skills are my pride and my joy, so when I feel like someone is demeaning towards me or does not believe in them, I often get a bit discouraged and "shut down". It happens almost every time. Sometimes, I won't even look at things that I've made because I become ashamed of them. And I think, "Why? What for? What am I afraid of? Is it the opinion of others?" Time heals a lot, even with people who might bring up things that you did in the past reoccurringly, you can move on without them. It's like when you are walking down a path in a lazy race, and others will stop and laugh at your stumbling, but in that time that they stopped, you not only dusted yourself off, but you kept moving.

But I'm human, can anyone name a time where they were insulted in some way, or they met a disagreement with someone else and they hadn't felt uncomfortable? I wish I could. But instead of worrying about pipe dreams, the best thing to do, whether that's in the software world or not, is to not worry so much about what people say and to focus on what you feel you can do.

And then improve on it.

Just recently, I made a personal discovery about how, through starting small, I can get big ideas to expand upon my skill set. I am not unlike some people, I've let small setbacks become greater than they needed to be, and failed to go the extra mile, but here I am, taking the time to say

I have a problem and I want to improve.
How can I do that? It isn't by sitting around and talking about it. Instead of letting yourself "vegge out", or let your "comfort" set in, try getting out of your comfort zone. I like the motto; "Just do it". It has a nice feel to it.

Here's a nice and easy thing, pretty generic so you can apply it to just about anything.

Set a goal, it must be completed within the next three days. And do this for the next month. Chart/note everything you start, everything you complete, everything that you quit or just stop doing and everything that you are still working on.

Reward yourself.

Profit.

Sunday, July 28, 2013

[Python 3] Console Battery Monitor In Python [Using BAT0]

I never took up Lua, despite having a Lua-based Window Manager (AwesomeWM), I've been able to feel my way around with the help of some friends as well as a bit of googling. "Implementing a battery monitor into the wibox seemed wasteful," I thought. "Why not create a terminal battery monitor for the good of learning?"

And so I did.

Here's what the output looks like:


Here's the code [Image]:


Here's the code again[plain text]:

#!/usr/bin/python
# The full charge.

cf = open('/sys/class/power_supply/BAT0/charge_full')
cf = int(cf.readline().strip('\n'))

#The current battery charge

cn = open('/sys/class/power_supply/BAT0/charge_now')
cn = int(cn.readline().strip('\n'))

st = open('/sys/class/power_supply/BAT0/status')
st = st.readline().strip('\n')

# Creating the Percentage
   
percent = (cn / cf) * 100
   
#  Creating the Rounded Percentage
   
percents = str(percent)[0:2]
rpercent = int(percents)


def batMon(cf, cn, st):


    # Testing Whether or not it is Charging
    if rpercent == 20 and st != "Charging":
        print("\n!!!! Battery is low! Please charge it now!!!!")

    print("\n[Charging]: %s" % st)

    # Printing out the total Voltage to the console
    print("[Total Charge]: %d" % cf)
   
    # Printing out the current voltage to the console
    print("[Current Charge]: %d" % cn)
   
    # Printing out the Rounded and the actual percentage
    print("[Round Percent / Percent]: %s / %.2f" % (rpercent, percent))


if __name__ == "__main__":
    batMon(cf, cn, st)

This was a pet project of mine for a while. I just recently decided to get into it. It's released under GNU GPLv3.

Thursday, July 18, 2013

Taring and Untaring .tar, .tar.bz, .tar.gz, etc... [Tutorial][Novice]

For those lacking time (or patience), the tl;dr (too long; didn't read) is at the bottom.

Tar -  The GNU version of the tar archiving utility

This is the command line application which we'll be learning today. It's a rather simple application, really, most tend to somehow mentally overcomplicate it. Remember that just using man [command] will usually yield the man(ual) page for a terminal command!

A "tar archive" itself is those little files that have extensions like .tar, .tar.gz, .tar.bzip, .tar.bzip2, and etc. How we handle each of them will change depending a bit on what our needs are.
 Alright, let's go right into our little black box, of course!

 Now inside the plg directory in myhome folder (short for playground), I've shown what's inside the current directory, as well as the farm directory
And here we go, we're actually creating a tar archieve! It's as simple as that. The switches can be broken up as: tar -c -f, but it's just easier to go tar -cf, as long as the tar archieve is right after the -f switch [Which specifies the archive of choice], there's no problem.

Want proof of what's inside? No problem, the -tf switches list everything! "But what about if we modify a file?" Do we have to 're-tar' all over again? No problem, -uf will only update the files in the archive that have been modified... Or created! When we add 'v' we can see everything that happens when it happens!
"But now how do we extract the tar?" Simple as that! tar -xvf the_tar_you_want.tar and it's done in record time!
 "What about .bz files?" What about them? To create them, just add a lowercase j anywhere in the primary switch! 
-jcf -jcvf -cjvf -cvjf... 
You get the idea!


 It's just intense how just adding a single letter changes everything and leaves it the same!

 Wow! Even .tar.gz files we can create! There's nothing to it with the -z switch added on!

And- You get the idea!

Hopefully, this tutorial was helpful enough for especially newbies to linux, as far as the tar command is concerned. I see a lot of these tutorials out there, but not many that actually use images of the prompt, step by step.

tl;dr

tar -cf creates regular .tar archive
tar -tf  lists what's inside the tar archive
tar -xf untars the regular .tar archive
tar -uf updates the tar archive with the newer versions of files, as well as adds new files that didn't exist before.

Adding j (in any order to -cf like -jcf, etc...) allows us to perform any of these things on .tar.bz files, z (same as j) allows these on .tar.gz, capital J (same as j and z)  allows it on .xz files.

Monday, June 3, 2013

[Basic] How To Create Classes In Python [ Object Oriented Programming ]


Let's start by explaining one thing at a time...


Classes
in python, are a way to bundle data [information that is fed to the code, or that you 'hard-code' yourself], with associated code, making it easier to manage the code itself and fix bugs if they ever arise. They can help by allowing you to model the problem you’re trying to solve and manage a program’s complexity better.


Let's say you're creating a fighting game where there are two types of NPC's. Bystanders, and fighters. You'd create the "bystander" class as easily as this:

class Bystander:
    pass


You've created the Bystander class. Why is this so great? Because this means that you can set this class to as many variables as you want, and you'll be able to have numerous different "versions" or "instances" of each:

bobby = Bystander()

sarah = Bystander()

"bobby" and "sarah" Are two different "instances" of the same class called "Bystander".

They are what are known as objects. Individual "occurances" or "copies" of the same class. You'll understand why this is so cool in a minute.

Let's modify our class a bit to get a better grasp of what we're dealing with here.

# We created the class called "bystander".
class Bystander:
# Here, we'll have a docstring. They're good for telling what
# our classes do.
"""A Simple Bystander class. These Individuals all have their own greeting."""
    # Now we create what's known as a "constructor" [__init__]
    # Which allows us to take the variables that are passed to the
    # class when the object is "instantiated" or "created".
    # It uses self because it is actually referring to the variable
    # that you use to create the objects.
    def __init__(self, name, greeting = ""):
        self.name = name
        self.greeting = greeting

 #Then we instantiate our objects.
bobby = Bystander("Bobby", "Hiya!")

sarah = Bystander("Sarah", "Konnichi wa!")
 # Notice that Alex doesn't have a greeting, but there will not be an error.
 # That's because the greeting is a "kwarg" or a "keyword argument". It
 # Is an optional argument or "parameter" that can be passed.
alex = Bystander("Alex")
# Please note that no matter how many objects we have, we'll always
# know what objects of this specific class are capable of in the case of 'Methods'.

A Method is a function of a class that is made specifically to be associated with the class itself. Methods must always take the "self" parameter because when it uses "self" it is actually referring to the object itself.


class Bystander:
""" A Simple Bystander class. These individuals have their own greeting."""

def __init__(self, name, greeting = ""):
self.name = name
self.greeting = greeting 

def say_Name(self):
print(self.greeting + " My name is", self.name + ".") 

bobby = Bystander("Bobby", "Hiya!")

bobby.say_Name()

Kira = Bystander("Kira", "Oh, yeah, baby!")

Kira.say_name()
Running this through the interpretor, we should get:

Hiya! My name is Bobby.
Oh yeah, baby! My name is Kira.

I hope this should provide a basic enough insight on how classes and objects are made. I'll leave the rest up to your imagination.

Friday, May 24, 2013

How to use Vim [Navigation and Text Editing]

Remember when you first started to type and everything was slow? Of course you looked down at the keys here and there to make sure you were pressing the right letter, but after that, you were good, right? Well, what's stopping you from learning Vim? I mean, yeah sure, to initially begin outside of input mode seems a bit odd, but to be honest, it really isn't that big of a deal. Vim is fast because it keeps you from reaching down for the mouse, or arrow keys every two seconds just to change your position, therefore, reducing the amount of movement your hands have to do, and also not forcing you to shift from your comfortable position [yes, Vim is for the lazy].


When you initially begin using Vim, you're probably a bit flustered that you can't just "start typing in text" right from the get go. Well, that's okay, just press the "i" key and you should be all set. Take note of the table below that tells of all the basics of moving and editing in Vim and give them a shot in the editor itself.


    i     Allows you to insert text where the cursor is.
I Allows you to insert text at the beginning of a line without whitespace
a Allows you to insert text at the end of a line.
oAllows you to insert text below the current line
OAllows you to insert text above the current line
Esc
Exit insert mode
j<n> Move the cursor down< A certain number of lines>
k<n>
Move the cursor up < A certain number of lines>
dd
Delete line
d<n>d
Delete a number of lines [including the one currently selected]
ggGo to the first line
GGo to the last line
g<n>gGo to a specific numbered line
x
Delete Character after cursor
X
Delete Character before cursor
w
Move an entire word ahead, ignoring spaces [white space]
b
Move an entire word back, ignoring spaces [white space]
dwdelete the next word
dbdelete the last word
d<n>wdelete the next <amount> words
d<n>bdelete the last <amount> words

Follow me on twitter! @ehldmnt

Sunday, May 12, 2013

Organizing Your Python Scripts: A Guide For All Who Want to have neater code

When organizing your python scripts, it is good to have certain layout when you're programming, as to reduce the amount of stress about the order of things later. I'll define here some rules for functions, classes, and variables, and some tips for how you'd probably code your scripts. I'll be updating this list as things come to mind.

Tips and Tricks


  • Always write your imports at the top of your script.
  • Always define your functions at the beginning of your scripts and call the functions that are called by others before them.
  • Always make sure that you call your variables before you call your functions.
  • Always make sure to comment your code if you don't think you'll remember what it's doing.
  • Always use docstrings to explain what any piece of your code is doing.
  • Always define proprietorship at the top of every script that you write, the name of the script, and the license. 
  • Always use consistent indentation, not matter what, or expect indentation errors.

Wednesday, April 3, 2013

A Bit More on Chmod & Chown

There are a few more things that I would like to introduce when it comes to the chmod and the chown command, one of these things being options that can be passed to reduce the amount of typing the user does in the command line. I'm certain that there are those of us who have had yet to learn how to touch type in QWERTY and even fewer of us who have learned to type in DVORAK. There is such thing as OCTAL NUMBERS that I would like to introduce in this chapter.

Octal Numbers

With octal numbers:
  • They are any number between 0 and 7.
  • Each digit in an octal number represents three binary digits.

Now, for further explanation, you lay out a chart like this for better understanding:


OctalBinaryFile Mode
0000---
1001--x
2010-w-
3011-wx
4100r--
5101r-x
6110rw-
7111rwx

How This Can Be Applied to Chown

Now, you would use octal numbers as an 'option' rather than an argument when you're making a change to a file, but unlike most options that we have seen, it does not possess a "-" before it. That's okay, different programs might not even contain options and might just have the program itself and yet the use of the program, or command, may vary. For example:

chmod 777 text.txt.


With an ls -l, we'd see that everyone can see, edit, and execute the file called "text".


But what if we don't want to put in that extra typing into the command line to see what the changes made were? Then we use the '-c' [called 'change'] option to print only if there was a change. If you want an output regardless, use the '-v' [called verbose] option.


These same commands can be passed to someone who wants to print the change in a file [if there is one], or just the supposed adjustments made regardless of whether there is an actual change or not.

And Those Two Options Are The Same For Chown

Simply 'chown -c olduser newuser' where the 'olduser' is the original owner and 'newuser' is the new owner, will print a change only if there is one, but 'chown -v olduser newuser' will print a change regardless.

That's it.


Thanks for taking the time to read this and be sure to comment if there is anything that you are fuzzy about or that you do not understand. useradd

userdel


usermod

Monday, April 1, 2013

The Linux Command Line Interface -- File and Directory Manipulation Tutorial

Manipulating Files & File Permissions

Now before we even get started, this is going to be a bit of a large article, so you can read maybe the first three commands and study them or you can try and learn everything here as you go along.

First off, I'll start by explaining files and file permissions in layman's terms so that everyone can easily grasp the concept.


ls -l & ls -h


ls -l is a very useful command that is good to know for a few reasons.

Regular ls:


ls -l:


Let's take a closer look at the output of one of these commands. ls -l prints a "longer version" of the ls command. Here are two perfect examples of the ls -l output.


Now, there are two things. The user name "vadim" and the group "users". They sit beside the 10 characters on the far left. After that is the file size in kilobytes, the last time it was modified, and finally, the name. Now that I've clarified that, I'll explain those characters a bit more.

"d" in the first strip represents a "directory", in the second strip, it is a "-" which represents a file. You'd see as "l" if it was a link, which is similar to a "shortcut" in windows [We'll go over creating links in a later guide]. The r stands for "read" which means that you can see, and look into the file. W meaning "write" means that you can edit or "write" into the file, and "x" means you can "execute" that file, like for example if it was a program of some kind then you could run it by typing ./programname and hitting enter in the terminal.
There are nine of these characters, the first one being for the owner of the file which is the user name that is listed above. The second one being the group that is "users". Anyone in the "users" group on the computer can edit the file. The last, being "global" or "everyone". Anyone can read and execute, or go into the (d)irectory.
In the file (as expressed by the "-"), the owner can read, but not execute the file and every one else can only read it, and see that it's there.

ls -lh


The only thing that ls -lh changes is the way that the file size is read. It actually tells you that it is 4.0K(ilobytes) instead of expecting you to figure it out.

For more, see man ls.

cp


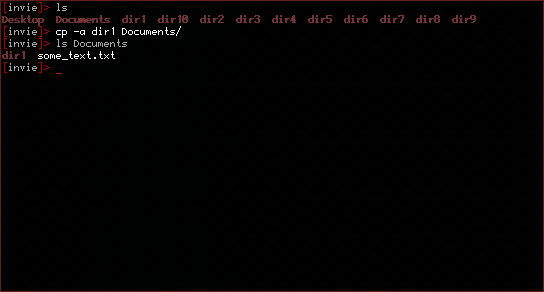
The cp command is actually a very simple command. It copies a file from one place in the file system to another. Say we had a file on the Desktop called "some_text.txt". We wanted to copy that file to our "Documents" directory.

To copy that file:


As you can see, I've both copied the file and then shown you that it is now ALSO in the Documents folder. "But what if we want to move folders? It just tells me that it 'omitted the directory'." - That's why we use the -a option for "archive".


For more, see man cp.

mv

Let's say that we didn't want our text file to be "some_text.txt" anymore, and we wanted to name it "a_text_file.txt". That's where the move command comes in.

But it doesn't just "rename" files, it also allows us to move them too! That's why it's called "move"!


You do not need an option to move a folder.


For more, see man mv.
mkdir


Being able to edit directories is fine, but what about making them? mkdir does this.


rm


What about getting rid of, or r(e)m(oving) the old file that's on the desktop? No problem.


Once again, an option is needed to remove directories. That option is -r.


It is extremely important that you do not remove things you think you might want to recover later with the "rm" command. There is no way to recover those files! To be extra careful, add the -i option to prompt you before every removal!


For more, see man rm.

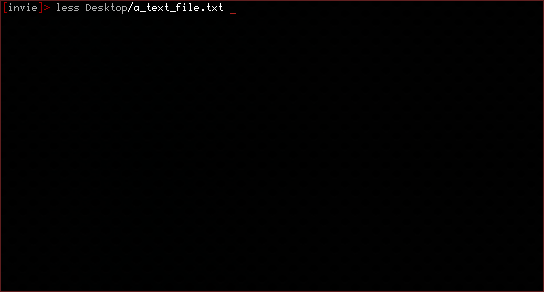
less


The less command just allows you to read your text files.


For more, see man less.

chmod


Remember what we were talking about with permissions? This command allows us to change the permissions of a file. "u" represents the user, "g" represents the group, and "a" represents "all" or everyone.


But what if we wanted to be selfish and make it so that no one but ourselves could see, change, or edit the file?


For more, see man chmod.

chown


But let's say that we wanted to change who owned the file?


For more, see man chown.

If there are any questions or criticisms, feel free to comment.

Tuesday, March 26, 2013

The Linux Command Line Interface -- System Navigation Tutorial [Part 1]

The linux terminal is a tool that can very easily simplify a lot of different tasks.

I'll be going over 3 system navigation tools, as well as the linux file system, though you'll need to open the terminal first.

Like so:


The key-bindings, distro-to-distro might be different. But on ubuntu it is ctrl+alt+T, the keybinding in awesomewm is actually mod4 + enter [Windowskey-Enter], and that is distro wide.

The Linux File System


The linux file system is a bit like an up-side down tree. It is universal in every linux distro.

A bit like this:


A bit more embedded details:

It is a hierarchy system of directories or "folders" as a windows user might term it. Though it doesn't have a C:\ for the top of all folders inside of the computer, instead, it has / [pronounced root but don't be confused by /root or the root user folder]. When people say "root" they're referring to what is known a "super user" or the highest system administrator imaginable on the system which is why protecting the root password is important. Dot files [.foo, .bar for example] are hidden files that can only be seen by using a specific option with a command. Options change the basic function or behaviour of the command in and of itself as we'll soon learn.

Click here to learn more about the linux file system.

Linux Commands


Commands in the CLI that come with bash, typically work like this:

[COMMAND] [OPTIONS] [ARGUMENTS]

For example:
ls -a /usr/bin

This will show all folders and all dot folders [like .foo] inside of the /usr/bin folder. Options will usually always have a dash (-) in front of them unless it is explicitly told as otherwise. You can use more than one option in a fashion such as:

ls -a -t /usr/bin

This will show all of the things inside of the folder according to their modification date. But that's not all. You can also combine options to form a "super option".

ls -at /usr/bin

 
ls


This is one of the most useful commands that you'll ever use. "ls" stands for List, which means to list all of the files in the directory. Try it out for yourself like in the image below.


This command is useful because it enables us to see what is inside any folder at any given time that the prompt is available and as a result allows us to see what is inside our system. You can use ls to not only see what is inside the current folder, but others as well.


And as you can see from this image, you not only can do one at a time, but more than one if you add them to your "arguments". An example of an option or two thrown in for fun:


cd

The letters "cd" are an abbreviation of the words "Change Directory". Let's say we had a folder called "books" in the home folder. Then all you have to do is type:


And you'd be in the "books" directory. That's all there is to it.

pwd

You know how to get to a folder, and how to see what's inside, but let's say you don't know where in the file-system you are? "pwd" is the answer. To implement it, do:


It'll print the full path in the system, which is pretty useful when you don't know where you are exactly.

Man Pages


To learn more about any command we learned above, and it's optionn, all you'd have to do is type "man [COMMAND]". That's all there is to it.

If there are any questions or criticism, feel free to comment.