Just A Small Guideline

Feel free to browse the site. Don't be afraid to leave comments, they're supportive.
Please follow me on Twitter @ehldmnt and retweet my posts.
Showing posts with label tut. Show all posts

Sunday, July 28, 2013

[Python 3] Console Battery Monitor In Python [Using BAT0]

I never took up Lua, despite having a Lua-based Window Manager (AwesomeWM), I've been able to feel my way around with the help of some friends as well as a bit of googling. "Implementing a battery monitor into the wibox seemed wasteful," I thought. "Why not create a terminal battery monitor for the good of learning?"

And so I did.

Here's what the output looks like:


Here's the code [Image]:


Here's the code again[plain text]:

#!/usr/bin/python
# The full charge.

cf = open('/sys/class/power_supply/BAT0/charge_full')
cf = int(cf.readline().strip('\n'))

#The current battery charge

cn = open('/sys/class/power_supply/BAT0/charge_now')
cn = int(cn.readline().strip('\n'))

st = open('/sys/class/power_supply/BAT0/status')
st = st.readline().strip('\n')

# Creating the Percentage
   
percent = (cn / cf) * 100
   
#  Creating the Rounded Percentage
   
percents = str(percent)[0:2]
rpercent = int(percents)


def batMon(cf, cn, st):


    # Testing Whether or not it is Charging
    if rpercent == 20 and st != "Charging":
        print("\n!!!! Battery is low! Please charge it now!!!!")

    print("\n[Charging]: %s" % st)

    # Printing out the total Voltage to the console
    print("[Total Charge]: %d" % cf)
   
    # Printing out the current voltage to the console
    print("[Current Charge]: %d" % cn)
   
    # Printing out the Rounded and the actual percentage
    print("[Round Percent / Percent]: %s / %.2f" % (rpercent, percent))


if __name__ == "__main__":
    batMon(cf, cn, st)

This was a pet project of mine for a while. I just recently decided to get into it. It's released under GNU GPLv3.

Wednesday, June 12, 2013

Python 3: Classes; a quick examination.

Object Oriented Programming [OOP] is not really a new concept. It's something that Python does, and does well [even if there is room for improvement]. This guide goes as far to explain pretty much how classes work in Python. Comment below with any questions or comments.

I feel that there really aren't many tutorials out there to explain this a bit more in depth. Here is a much more well rounded explanation [compared to the sparse material I've found]:

Classes are basically what they're called, "classes" or "classifications" for certain "kinds" of things. We can take for instance a chair, and a dog. They both have four legs, but which one is made of wood? And what exactly is a leg? Something that can move or something that holds the chair up? We could create a class called "animate".

class Animate:
pass

Well, isn't that nice? We have a class that does absolutely nothing. But that's okay, it'll all fall into place. The pass statement allows us to create something that syntactically requires some code or data, but doesn't actually do anything at all. Let's create a second class called "Inanimate".

class Inanimate:
pass

Once again, we have a class that does nothing, but the diference between the two of them is their namespace. We now have an "Animate" and an "Inanimate" class. Now for objects.

chair = Inanimate()

dog = Animate()

This seems like old news, "We're just renaming the classes to chair and dog!". Not quite. In OOP [Object Oriented Programming] we can have as many inanimate or animate objects as we'd like.

pencil = Inanimate()

cat = Animate()

 Are two other seperate "instances" of the class. In fact, this is called "instantiating." In this case, for those of us who don't quite understand, a dog is an "instance" or a particular "existence" while a "cat" is a separate instance. To learn more about what can be done, let's edit our classes directly.

class Inanimate:
def __init__(self, name, type):
self.name = name
self.type = type

We've done a lot here, so let's go over it piece by piece. Each class has a special "function" called a constructor. The __init__ function. It allows us to specify attributes of each particular class that we have. It makes us creating different classes a lot more structured. Inside of the __init__ constructor, we see one element called "self" and we see two elements called "name" and "type". If they were specified like this:

def __init__(self, name, type = "Furniture"):

Then it would make all inanimate objects "Furniture" by default, but it would also make the particular attribute "type" optional, like optional arguments on a command line, which is both a good and a bad thing. If you made it "item" or even just an empty string, that would be far more practical. Because in that case, that would mean that "Pencil" would be furniture, too. The reason why you set self.name to the "name" parameter, is because you're basically setting the dot operator, as well as making whatever you put in the class at instantiation permanent to that specific instance of the class.

Pro Tip:

You can make each of the variables private by adding one or two underscores (_) to the beginning of each attribute like this:
def __init__(self, name, type:)
self._name = name
self._type = type

This actually much more use, like for example, if you didn't want people to alter your class, or when they didn't need to alter the class at all, using the API to work with it.

"But what is self?!" Self is referring to the "variable" of the object itself. When the python interpretor runs, it goes like this:

- It sees the class you made.
- It sees that you instantiated [Remember, that means 'create'!] an object.
- It takes the name of that object and goes back to read the class. It replaces self with the title of the object you had given it.
- It continues running the script.
 
Now we must edit our "chair" object.

chair = Inanimate("Chair", "Furniture")

dog = Animate()

Hm... That's nice, but let's say you wanted to return self.name? How would you go about doing that? Why, with a method of course! Methods are just functions that exist inside of a class that can be used along with flow controls [if, for, while] in order to increase the functionality. Let's create a method that returns the name of the item!

class Inanimate:
def __init__(self, name, type):
self.name = name
self.type = type

def getName(self):
return self.name

chair = Inanimate("Chair", "Furniture")

print(chair.getName())

Using this, we can actually reduce the amount of code we write later. Because we're using classes, we can do this for EVERY class. And that is some of the power of Object Oriented Programming.

Monday, June 3, 2013

How to screen capture in linux, audio, video, or both.

I initially under estimated the ffmpeg command and have been abusing it for its abilities to convert my audio files after downloading them from youtube!

The all-mighty screen capture command:

ffmpeg -f x11grab -s wxga [or instead of 'wxga' another screen size like 1300, 800] -r 25 -i :0.0 -qscale 0 -f alsa -i hw:0 -strict -2
The all-powerful audio capture command:

ffmpeg -f alsa -i hw:0 [or another alsa device] -strict -2

[Basic] How To Create Classes In Python [ Object Oriented Programming ]


Let's start by explaining one thing at a time...


Classes
in python, are a way to bundle data [information that is fed to the code, or that you 'hard-code' yourself], with associated code, making it easier to manage the code itself and fix bugs if they ever arise. They can help by allowing you to model the problem you’re trying to solve and manage a program’s complexity better.


Let's say you're creating a fighting game where there are two types of NPC's. Bystanders, and fighters. You'd create the "bystander" class as easily as this:

class Bystander:
    pass


You've created the Bystander class. Why is this so great? Because this means that you can set this class to as many variables as you want, and you'll be able to have numerous different "versions" or "instances" of each:

bobby = Bystander()

sarah = Bystander()

"bobby" and "sarah" Are two different "instances" of the same class called "Bystander".

They are what are known as objects. Individual "occurances" or "copies" of the same class. You'll understand why this is so cool in a minute.

Let's modify our class a bit to get a better grasp of what we're dealing with here.

# We created the class called "bystander".
class Bystander:
# Here, we'll have a docstring. They're good for telling what
# our classes do.
"""A Simple Bystander class. These Individuals all have their own greeting."""
    # Now we create what's known as a "constructor" [__init__]
    # Which allows us to take the variables that are passed to the
    # class when the object is "instantiated" or "created".
    # It uses self because it is actually referring to the variable
    # that you use to create the objects.
    def __init__(self, name, greeting = ""):
        self.name = name
        self.greeting = greeting

 #Then we instantiate our objects.
bobby = Bystander("Bobby", "Hiya!")

sarah = Bystander("Sarah", "Konnichi wa!")
 # Notice that Alex doesn't have a greeting, but there will not be an error.
 # That's because the greeting is a "kwarg" or a "keyword argument". It
 # Is an optional argument or "parameter" that can be passed.
alex = Bystander("Alex")
# Please note that no matter how many objects we have, we'll always
# know what objects of this specific class are capable of in the case of 'Methods'.

A Method is a function of a class that is made specifically to be associated with the class itself. Methods must always take the "self" parameter because when it uses "self" it is actually referring to the object itself.


class Bystander:
""" A Simple Bystander class. These individuals have their own greeting."""

def __init__(self, name, greeting = ""):
self.name = name
self.greeting = greeting 

def say_Name(self):
print(self.greeting + " My name is", self.name + ".") 

bobby = Bystander("Bobby", "Hiya!")

bobby.say_Name()

Kira = Bystander("Kira", "Oh, yeah, baby!")

Kira.say_name()
Running this through the interpretor, we should get:

Hiya! My name is Bobby.
Oh yeah, baby! My name is Kira.

I hope this should provide a basic enough insight on how classes and objects are made. I'll leave the rest up to your imagination.

Sunday, June 2, 2013

How I Stop My Blogging Procrastination [and Other Procrastination in General] -- It works every time [Almost ;)]

Sometimes, when I'm sitting around thinking about things, or considering what to write, I start off by googling for some bit of information that I'm looking for, and I usually attempt to explain it in depth... Unless I get lazy.

It happens to the best of us, even those with obsessive hobbies like myself. But my solution that's been working the best for me is to start an article and then go back to it later, but I limit myself to three articles and do not allow myself to go on to other subjects!

Another trick is to limit distractions, like my iphone, I have this habit of texting other people when I've got nothing to do instead of staying focused. I'm a person who likes quiet and focuses better without distractions, even if I might want the occasional distraction to keep my wandering brain from becoming bored.

Or maybe I'll go on Facebook, or Twitter. I like Twitter a lot by the way. For some reason, in my opinion, it tends to lack in all of the drama that comes with interacting with your family and friends. I'm a believe a little in the Zodiac [horoscopes], and being a Gemini, it's hard for me to stay focused, which is my reason for writing this post in the first place.

But all of that is besides the point. Que; bullets:

  • Minimize distractions: If you're not the type of person who can remain focused on one topic for two long, or who has a tendency to stray from things to do others of greater personal interest, then it's best to minimize those other things around you that have a chance of catching your attention.
  • Take breaks: There's nothing wrong with this. You're only human, don't beat yourself up over the fact that you weren't able to write a 5000 words tl;dr post for the third time this week.
  • Limit the number of things on your plate: Like I said earlier in this post, it's better to limit yourself to maybe two or three posts to write on and stick to them.
  • Brainstorm: Writer's block is a bitch, 'nuff said. Sometimes there's just not anything interesting to talk about, going back to my 'googling talk'. There's no shame in knowing nothing, there is in knowing everything. The best thing to do in this case, is to relax and not stress so much about the content but the quality of your writing. Go back, fix grammatical mistakes, spelling errors, and polish up your post. You could have the best content in the world and if it looks like garbage with "u shud" and "dis is y u mus", a lot of the time, people are going to keep on scrolling on google. It isn't you, it's their standards being such that if the person doesn't have time to write properly, who's to say their guide isn't rushed?
  • Have fun: When you stop having fun, you stop wanting to work, and when you stop working nothing gets done. Keep this in mind.
  • Use the three S's and work from there: Short, Simple, Straight to the point. Once you bang out the bare bones of the knowledge that you need, go around and add your fluff. No need to stress and force yourself to work harder than you need to unless you really feel like it. Besides, if you keep things on point, you can better keep your own attention. You can always add on pieces, here or there to make it easier on yourself, and maybe re-advertise your content in a non-illegal and malicious fashion, of course.
Follow me on Twitter: @ehldmnt

A random coding tidbit... How to pause your Python code.

Ever needed a pause for dramatic effect. Why not use the native "time" module to get the job done?


Friday, May 24, 2013

How to use Vim [Navigation and Text Editing]

Remember when you first started to type and everything was slow? Of course you looked down at the keys here and there to make sure you were pressing the right letter, but after that, you were good, right? Well, what's stopping you from learning Vim? I mean, yeah sure, to initially begin outside of input mode seems a bit odd, but to be honest, it really isn't that big of a deal. Vim is fast because it keeps you from reaching down for the mouse, or arrow keys every two seconds just to change your position, therefore, reducing the amount of movement your hands have to do, and also not forcing you to shift from your comfortable position [yes, Vim is for the lazy].


When you initially begin using Vim, you're probably a bit flustered that you can't just "start typing in text" right from the get go. Well, that's okay, just press the "i" key and you should be all set. Take note of the table below that tells of all the basics of moving and editing in Vim and give them a shot in the editor itself.


    i     Allows you to insert text where the cursor is.
I Allows you to insert text at the beginning of a line without whitespace
a Allows you to insert text at the end of a line.
oAllows you to insert text below the current line
OAllows you to insert text above the current line
Esc
Exit insert mode
j<n> Move the cursor down< A certain number of lines>
k<n>
Move the cursor up < A certain number of lines>
dd
Delete line
d<n>d
Delete a number of lines [including the one currently selected]
ggGo to the first line
GGo to the last line
g<n>gGo to a specific numbered line
x
Delete Character after cursor
X
Delete Character before cursor
w
Move an entire word ahead, ignoring spaces [white space]
b
Move an entire word back, ignoring spaces [white space]
dwdelete the next word
dbdelete the last word
d<n>wdelete the next <amount> words
d<n>bdelete the last <amount> words

Follow me on twitter! @ehldmnt

Sunday, May 19, 2013

How to transfer files and directories over an SSH connection.

This is a long unanswered question that I had actually scowered the inernet for, never realizing that the answer was staring at me in the man pages. This guide assumes that you have a LAN ssh connection, and doesn't explain how to achieve one over the internet First things first, introducing the scp command.
[SYNTAX]

scp [OPTIONS] [FILE] [DESTINATION]

To copy a single regular text file called "important.txt" from the user "bob" on the present computer "maxie" to the remove computer user "mark"'s documents on a computer named "sandbox":

 scp important.txt mark@sandbox:~/Documents

 The only downside to this is that you have to know the exact directories, but this guide assumes that you already know where they are.

To copy an entire directory, maybe the "water_pictures" directory from "mark" on "sandbox" to "bob" on "maxie":

scp -r water_pictures bob@maxie

This will recursively [explicitly] show you everything that is being transfered, but it'll get the job done.

Sunday, April 28, 2013

UTAU, MMD, PMD/PMX Editor in Linux. -- Status, Installation, and more.

UTAU


If you know of Vocaloid, you probably know of UTAU. UTAU is a singing synthesis shareware application designed for Microsoft windows [With it's recent Mac Implementation which has spurred some rumors of another version to soon come out for Linux], that allows users to create their own "voice banks" and have their personal "UTAU's" sing in harmony. It is known to at times produce better, more realistic results than Yamaha's Vocaloid, amongst others, but requires more effort on part of the user.


MMD [Miku Miku Dance]


If you know of UTAU, you probably know of Miku Miku Dance. Miku Miku Dance is free software that is designed for Microsot Windows that allows users to move models that either they or others created. This can be use to create lipsyncing videos, music and dancing videos, PV's, home made movies (with the models) amongst other things, frame by frame.

PMD/PMX Editor


This program was also designed for Windows. It is for the creation and editing of .PMD/.PMX files that are used to dance/move/sing in MikuMikuDance.


Prerequisites [Required Programs]:


-- Linux Distribution [Any kind will do, really]
-- Playonlinux
-- Wine
-- Winetricks
-- Japanese Locale Enabled

Assuming that you already have a Linux distribution coming to this tutorial, first, download and install the lastest play on linux version. At the time of this tutorial, that would be 4.2.1. The instructions for installation depends upon your distro. If you use Arch like me, then it's no problem! Installation is as simple as popping a terminal and entering in:

pacman -Syu playonlinux wine winetricks

This command, not only updates your system but it also syncs to the repositories and gives you the proper programs that you need for this tutorial.

The Japanese Locale issue [This will demonstrate how to acquire it in Archlinux], is a no brainer. If locale -a yields anything similar to these:

C
POSIX
en_US
en_US.iso88591
en_US.utf8
ja_JP
ja_JP.eucjp
ja_JP.ujis
ja_JP.utf8 # Specifically this one
japanese
japanese.euc

zh_CN
zh_CN.gb18030
zh_CN.gb2312
zh_CN.gbk
zh_CN.utf8

Then there is really nothing else you have to do.

Otherwise, uncomment the line ja_JP.UTF-8 in the file /etc/locale-gen. And then run:

sudo locale-gen

If you already have these things, then great, skip this step.

Installation of UTAU


To install utau, it is pretty easy.

Steps:

1. Use Playonlinux To Install the Program.
2. Enjoy!

Step 1:

Select the install button as depicted above.


This dialogue should pop up.


Check testing and this dialogue should pop up, just click okay.


Then type into the search bar: UTAU, this should pop up.

Step 2:

Finish the installer and you're done! If it asks to create a virtual drive and/or a shortcut select yes! You can choose to install the English patch or not. Click on UTAU and hit the "run" button in the upper left corner.


Installing Miku Miku Dance/MMD [WIP -- Check back later for an update!


The installation of MMD is a bit more involved.

Prerequisites [Required Programs]:

-- Playonlinux
-- Wine
-- Winetricks
-- MMD

Steps:
1. Correct Settings, Create the 64 Bit Virtual Drive, and put MMD inside of it
2. Adjust the Windows version
3. Debug to figure out the required programs to run
4. Fix The Layout Issue
5. Enjoy MMD!


Step 1:

First, select tools.

Then select x64 and scroll down to the wine version 1.4-rc4-raw3 and install it. Then click on configure.


In the bottom left corner, select new, run through the installer and select 1.4-rc4-raw3 for your wine version.


Take note of the name of your Virtual Drive. The next part will be easier. Open a terminal and Do:

cd /path/to/the/mmdfile.zip
unzip -x *thezipfile*; cp -a *thefolderthatcomesoutofit* ~/.PlayOnLinux/wineprefix/nameofthevirtualdrive/drive_c/Program\ Files\(x86\)/

Now you go into the PlayOnLinux configuration dialogue and you click on "Create shortcut from virtual drive."


Step 2:

Now it's the time to adjust the Windows version. Click on the Wine tab Inbetween "general" and "install components" and select "Configure wine".


Then in the first part of the Windows 98 looking dialogue box on the bottom right, select "Windows 7". It should be towards the top.


You may now press apply and okay, and then close the dialogue boxes. Leave the main Playonlinux window open, the one that has your shortcuts in it.

Finally, you settings must match the ones I have up on my virtual drive. Select the "Display" tab second to last and then change your settings to match.


Step 3:

In order to complete step five, you'll have to select MMD, and then "debug" on the right hand side above "Report a problem". If no errors are returned and MMD runs successfully, congratulations, move to the next step! Otherwise, watch the error messages dialogue to figure out if there are any necessary .dll's.

Step 4:

With MMD open in Linux at the moment, it looks atrocious.

So, to solve this, click on the window and press  alt+ V and then alt+W (view > separate window). Resize them to your heart's content and enjoy MMD in linux.

Step 5:

So far in this wine version that we've selected, there are no issues with even multimodels. In fact, I feel like it ran faster in linux than it ever did on any of my Windows computers. The raw speed is incredible. The controls like on Windows are the same, so enjoy the familiarity of the program!!

Installing PMD/PMX Editor [WIP -- Check back later for an update!]


Wednesday, April 3, 2013

A Bit More on Chmod & Chown

There are a few more things that I would like to introduce when it comes to the chmod and the chown command, one of these things being options that can be passed to reduce the amount of typing the user does in the command line. I'm certain that there are those of us who have had yet to learn how to touch type in QWERTY and even fewer of us who have learned to type in DVORAK. There is such thing as OCTAL NUMBERS that I would like to introduce in this chapter.

Octal Numbers

With octal numbers:
  • They are any number between 0 and 7.
  • Each digit in an octal number represents three binary digits.

Now, for further explanation, you lay out a chart like this for better understanding:


OctalBinaryFile Mode
0000---
1001--x
2010-w-
3011-wx
4100r--
5101r-x
6110rw-
7111rwx

How This Can Be Applied to Chown

Now, you would use octal numbers as an 'option' rather than an argument when you're making a change to a file, but unlike most options that we have seen, it does not possess a "-" before it. That's okay, different programs might not even contain options and might just have the program itself and yet the use of the program, or command, may vary. For example:

chmod 777 text.txt.


With an ls -l, we'd see that everyone can see, edit, and execute the file called "text".


But what if we don't want to put in that extra typing into the command line to see what the changes made were? Then we use the '-c' [called 'change'] option to print only if there was a change. If you want an output regardless, use the '-v' [called verbose] option.


These same commands can be passed to someone who wants to print the change in a file [if there is one], or just the supposed adjustments made regardless of whether there is an actual change or not.

And Those Two Options Are The Same For Chown

Simply 'chown -c olduser newuser' where the 'olduser' is the original owner and 'newuser' is the new owner, will print a change only if there is one, but 'chown -v olduser newuser' will print a change regardless.

That's it.


Thanks for taking the time to read this and be sure to comment if there is anything that you are fuzzy about or that you do not understand. useradd

userdel


usermod

Tuesday, April 2, 2013

Awesome-WM: How to Set Dvorak [or other keyboard layouts] as default.

In my personal experiences with AwesomeWM, I could not seem to set the DVORAK keyboard layout without messing around with the xorg.conf files, and even then it was to no avail.

As an actual solution [or in other words 'work around' to this, the ~/.xinitrc file must contain:

setxkbmap -layout dvorak [or ru, fr, etc..]

Before the line:

exec awesome

And that should solve the issue.

Monday, April 1, 2013

The Linux Command Line Interface -- File and Directory Manipulation Tutorial

Manipulating Files & File Permissions

Now before we even get started, this is going to be a bit of a large article, so you can read maybe the first three commands and study them or you can try and learn everything here as you go along.

First off, I'll start by explaining files and file permissions in layman's terms so that everyone can easily grasp the concept.


ls -l & ls -h


ls -l is a very useful command that is good to know for a few reasons.

Regular ls:


ls -l:


Let's take a closer look at the output of one of these commands. ls -l prints a "longer version" of the ls command. Here are two perfect examples of the ls -l output.


Now, there are two things. The user name "vadim" and the group "users". They sit beside the 10 characters on the far left. After that is the file size in kilobytes, the last time it was modified, and finally, the name. Now that I've clarified that, I'll explain those characters a bit more.

"d" in the first strip represents a "directory", in the second strip, it is a "-" which represents a file. You'd see as "l" if it was a link, which is similar to a "shortcut" in windows [We'll go over creating links in a later guide]. The r stands for "read" which means that you can see, and look into the file. W meaning "write" means that you can edit or "write" into the file, and "x" means you can "execute" that file, like for example if it was a program of some kind then you could run it by typing ./programname and hitting enter in the terminal.
There are nine of these characters, the first one being for the owner of the file which is the user name that is listed above. The second one being the group that is "users". Anyone in the "users" group on the computer can edit the file. The last, being "global" or "everyone". Anyone can read and execute, or go into the (d)irectory.
In the file (as expressed by the "-"), the owner can read, but not execute the file and every one else can only read it, and see that it's there.

ls -lh


The only thing that ls -lh changes is the way that the file size is read. It actually tells you that it is 4.0K(ilobytes) instead of expecting you to figure it out.

For more, see man ls.

cp


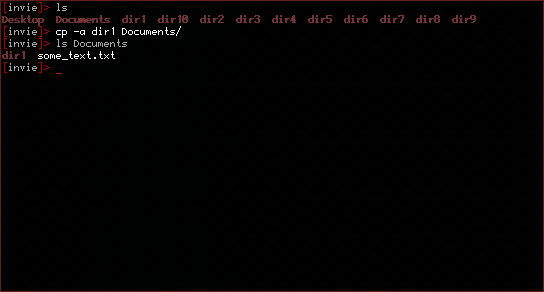
The cp command is actually a very simple command. It copies a file from one place in the file system to another. Say we had a file on the Desktop called "some_text.txt". We wanted to copy that file to our "Documents" directory.

To copy that file:


As you can see, I've both copied the file and then shown you that it is now ALSO in the Documents folder. "But what if we want to move folders? It just tells me that it 'omitted the directory'." - That's why we use the -a option for "archive".


For more, see man cp.

mv

Let's say that we didn't want our text file to be "some_text.txt" anymore, and we wanted to name it "a_text_file.txt". That's where the move command comes in.

But it doesn't just "rename" files, it also allows us to move them too! That's why it's called "move"!


You do not need an option to move a folder.


For more, see man mv.
mkdir


Being able to edit directories is fine, but what about making them? mkdir does this.


rm


What about getting rid of, or r(e)m(oving) the old file that's on the desktop? No problem.


Once again, an option is needed to remove directories. That option is -r.


It is extremely important that you do not remove things you think you might want to recover later with the "rm" command. There is no way to recover those files! To be extra careful, add the -i option to prompt you before every removal!


For more, see man rm.

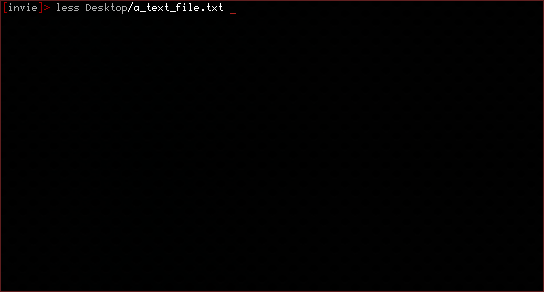
less


The less command just allows you to read your text files.


For more, see man less.

chmod


Remember what we were talking about with permissions? This command allows us to change the permissions of a file. "u" represents the user, "g" represents the group, and "a" represents "all" or everyone.


But what if we wanted to be selfish and make it so that no one but ourselves could see, change, or edit the file?


For more, see man chmod.

chown


But let's say that we wanted to change who owned the file?


For more, see man chown.

If there are any questions or criticisms, feel free to comment.

Tuesday, March 26, 2013

Buliding A Simple Game In Python3

In order to have a better understanding of the program that I am writing, I've decided that I would write a dead simple tutorial series on how to make a small game in Python. Links to all of my places of reference will take place as I find them.

Step 1: Setting up the script

There are two ways we can write this script.
-- As as executable. [Optional]
-- As a script to import into the interpreter so that we can update it as we go along. [Recommended, but also optional]

The first way is as such:

#!/usr/bin/python3

def function():
...


The second way:


def function():
...


And then simply execute it in the shell like so:

[~]> python3 script.py
Or Import it into the Python3 interpreter like so:
[~]> python3
>>>> import script
>>>>
Now, onto the actual coding..

#-- Say Game Title --#
print("---------------------------------------")
print("\nWelcome to \"Dineros\"\n")
print("---------------------------------------")
#-- Defining Global Variables --#
x_pos = 0
y_pos = 0

#-- Event Functions --#

#N/A

#-- Shitty Functions that don't really work --#

#def wall():
#    global x_pos, y_pos
#    if x_pos >= 10 and y_pos >= 10:
#        print("You hit a wall.")
#        x_pos = 10 and y_pos = 10
#    if x_pos <= -10 and y_pos <= -10:
#        print("You hit a wall.")
#        x_pos = -10 and y_pos = -10


#-- Main Game Function --#

# Define the function "move"
def move():
    # Refer to the variables we made earlier, not ones made locally.
    global x_pos, y_pos
    # Create an array of words that will be later used.
    where = ("\nWhere would you like to go?",
    "\nYou can go\n(N)orth, (S)outh, \n(E)ast, or (W)est.\n",
    "Or you can find out (wh)ere you are.\n")
    # Print objects from that array in the order as we need it to. We'll improve this later.
    print(where[0])
    print(where[1])
    print(where[2])
    # Create a prompt by which people know they are to type. 
    dir = input('> ')
    # If you put in capital or lower case n
    if dir == "N" or dir == "n":
        # Then the global y_pos will have 1 added to it.
        y_pos += y_pos + 1
    elif dir == "S" or dir == "s":
        y_pos += y_pos - 1
    elif dir == "E" or dir == "E":
        x_pos += x_pos + 1
    elif dir == "W" or dir == "W":
        x_pos += x_pos - 1
    elif dir == "wh" or dir == "WH" or dir == "Wh" or dir == "wH":
        print("You are at %d x, and %d y,\n" % (x_pos, y_pos))
    #If you didn't type any of the things above, then it will ask you to choose a direction.
    else:
        print("\nChoose a Direction.")
        exit
        return(dir)

#-- Conclusion Var. --#

# The variable that defines how it all ends.
ending = 1

#-- Game Running --#
# The condition for as long as this game is running
while ending == 1:
# The function we defined earlier
    move()
# The places to be when this is all complete [temporary]
    if x_pos == 1 and y_pos == 1:
# The thing that stops the loop and ends the game.
        ending += ending + 1 


The program is far from complete, but this is a good start to our character being able to move. Load it up and try it for yourself!

Initialization Method 1:

[~]> ./script.py


Initialization Method 2:

[~]> python3 script.py


Initialization Method 3 [OPTIONAL]:

[~]> python3
>>>import script

The Linux Command Line Interface -- System Navigation Tutorial [Part 1]

The linux terminal is a tool that can very easily simplify a lot of different tasks.

I'll be going over 3 system navigation tools, as well as the linux file system, though you'll need to open the terminal first.

Like so:


The key-bindings, distro-to-distro might be different. But on ubuntu it is ctrl+alt+T, the keybinding in awesomewm is actually mod4 + enter [Windowskey-Enter], and that is distro wide.

The Linux File System


The linux file system is a bit like an up-side down tree. It is universal in every linux distro.

A bit like this:


A bit more embedded details:

It is a hierarchy system of directories or "folders" as a windows user might term it. Though it doesn't have a C:\ for the top of all folders inside of the computer, instead, it has / [pronounced root but don't be confused by /root or the root user folder]. When people say "root" they're referring to what is known a "super user" or the highest system administrator imaginable on the system which is why protecting the root password is important. Dot files [.foo, .bar for example] are hidden files that can only be seen by using a specific option with a command. Options change the basic function or behaviour of the command in and of itself as we'll soon learn.

Click here to learn more about the linux file system.

Linux Commands


Commands in the CLI that come with bash, typically work like this:

[COMMAND] [OPTIONS] [ARGUMENTS]

For example:
ls -a /usr/bin

This will show all folders and all dot folders [like .foo] inside of the /usr/bin folder. Options will usually always have a dash (-) in front of them unless it is explicitly told as otherwise. You can use more than one option in a fashion such as:

ls -a -t /usr/bin

This will show all of the things inside of the folder according to their modification date. But that's not all. You can also combine options to form a "super option".

ls -at /usr/bin

 
ls


This is one of the most useful commands that you'll ever use. "ls" stands for List, which means to list all of the files in the directory. Try it out for yourself like in the image below.


This command is useful because it enables us to see what is inside any folder at any given time that the prompt is available and as a result allows us to see what is inside our system. You can use ls to not only see what is inside the current folder, but others as well.


And as you can see from this image, you not only can do one at a time, but more than one if you add them to your "arguments". An example of an option or two thrown in for fun:


cd

The letters "cd" are an abbreviation of the words "Change Directory". Let's say we had a folder called "books" in the home folder. Then all you have to do is type:


And you'd be in the "books" directory. That's all there is to it.

pwd

You know how to get to a folder, and how to see what's inside, but let's say you don't know where in the file-system you are? "pwd" is the answer. To implement it, do:


It'll print the full path in the system, which is pretty useful when you don't know where you are exactly.

Man Pages


To learn more about any command we learned above, and it's optionn, all you'd have to do is type "man [COMMAND]". That's all there is to it.

If there are any questions or criticism, feel free to comment.

Friday, March 22, 2013

Frustration: AwesomeWM & My Use of Dvorak

Seeing as I have this lovely devotion to the DVORAK keyboard layout (to the extent that I literally rearranged the entire keyboard, upside down keys and all, specifically to facilitate this need), I tend to get extremely frustrated by what seems to be a bug in Awesomewm.

At first, it was just a minor annoyance, and then gradually it became a bit more than a nuisance as I literally have to reach into my 3 - 5 years of qwerty knowledge in order to remember what which key was supposed to be. Mind you, I've memorized the Qwerty and Dvorak style because there are those times in school where I have no choice but to use it.

This is all besides the point,

Which is that awesomewm is a great Window Manager but it doesn't seem to keep to anything I tell it to, which is extremely frustrating when I have to type Mod4 + R. I've looked into Xorg on the archwiki, amongst other things in the AwesomeWiki, but it seems that the only thing that ever solves it is restarting awesome after typing in "setkbmap dvorak" into a terminal. Thankfully, I have zsh, and that helped me through a lot of the worries because once I find the "s" on the keyboard (Which is right next to a for those that are wondering, where it used to be on Qwerty), I just had to press the up arrow key and found what I wanted.

If I find a solution for this, I'll write up a tutorial.

Wednesday, February 27, 2013

Learning To Code: Python & Linux = Awesome & How to get started on a Linux Operating System

So, in the short period of time that I've spend using GNU/linux (the last 7 - 7&1/2 months), I've acquired more than enough knowledge about command line editing and system administration. The only things I'm really still fuzzy about are the commands top and find, and that's just a small portion of my coding knowledge. I recently just barely dabbled in the art of Java, C, C++, and Javascript, I already know my HTML and my CSS so well that I really don't google much code anymore (except for a few subjects here and there that I'm also fuzzy about -- I'm talking to you --moz-border). The "CLI anxiety" came away from me when I destroyed my ubuntu set up to attempt to install Archlinux last summer and at first I was a bit upset but then I quickly got over it once I successfully managed to install arch. My point is, I really wanted to learn how to code something other than a half-assed webpage or a weebly layout for some friends. I wanted to screw around with different kinds of code, and even create an RPG but unsurprisingly, Linux lacks some RPG makers and ever since even before I switched from Vista [Lovely Service pack 2~!] I had been trying to learn this programming language called: Python.
You can acquire Python for *nix, Windows, Mac OSX, *bsd's etc, and it's a great programming language to learn as far as my very limited experiences go. But the point is, for a beginning learner of a programming language, the complexity of C, C++, and Java was too extreme for me, while Javascript, I found, well, useless to what I wanted to do. Now, the Python documentation is perhaps helpful for many people, but to me, it was really just a pain in my a**. It didn't explain much of anything, or at least didn't have many examples that had the potential of showing me how I could possibly utilize the tricks that were listed. Call me retarded if you want, but I couldn't work it for my life! Then I found Learn Python The Hard Way which to me is an amazing guide that taught me everything I wanted/needed to know and even answered some of my questions. It was clear to me after a while of reading the Python Documentation that it was definitely not geared towards newbies to programming and programming languages.

It was useless for me to try and figure out where I was going with it, because it gradually began to confuse me as I read it without any other form of foundation. That is what most linux users aspiring to write code need in my personal belief. For those interested in learning a programming language, for those ubuntu users who just recently switched from Windows, or for those who are in the process of doing so, or even those who just want to know how to use the command line, I suggest to you download the e-book on Linuxcommand.org and get to reading. You don't even have to devote a lot of time to learning what you read because that guide is so basic that it's not even funny. The youtube user metalx1000 has a ton of bash tutorials and such.

Getting back on track, one who is interested in getting started on learning how to program should look into lifehacker's javascript guide, because it teaches some foundational things, especially for those who decide that they want to dive right into Java code. But this is all in my opinion, everyone has a different way of learning and they might actually find the Python Documentation a lot easier to learn than I might. The Internet is crawling with options, do what goes best with you.

Friday, February 22, 2013

Minecraft On Archlinux -- Tutorial

There are a few ways to go about getting minecraft on Archlinux and while the Wiki is there to guide you through . I recommend using my favorite AUR installer yaourt to get the job done.

Here's my Video Tutorial: